Buffalo Plaid Hat Knitting Pattern

here’s just something about buffalo plaid that’s extra cozy as the weather cools down. The classic checkered pattern takes me straight back to my childhood—a full-on Canadian winter, bundling up for nights of ice skating at our local lake and then warming up with hot chocolate by the fire.
This is the vibe inspired me to create this knit buffalo plaid hat pattern for you. I wanted it to have that cozy, homey feel that just works for fall and winter. Whether you’ve got similar memories or just love that classic, timeless look, this hat is the perfect way to bring those winter feels to your wardrobe. So, grab your needles and get ready to make some cozy, handmade memories!
If you are nervous to try stranded knitting (i.e. working with two colours), I urge you to watch my stranded knitting video tutorial. In the video, I demonstrate how I hold the yarn and switch colours in an easy way. Once you get some practice under your belt, you’ll be ready to knit up this simple, yet stylish winter hat!
Pay it Forward!
I hope you enjoy this pattern! Please feel free to share the link to this page on your social media or Pinterest account.
I truly appreciate all of you who get the word out about this site and my patterns!
❤️ Alnaar
[apsp-pin-image image_url=’https://www.pinterest.com/pin/480618591503443523′]
Please note that some of the links on this page are affiliate links, which means I will earn a commission if you purchase through these links. I use all of the products listed on this page and recommend them because they are companies that I have found helpful and trustworthy. Please let me know if you have any questions about anything I have recommended!
Materials:
- Knit Picks Swish worsted weight yarn:
- 1 Skein Cobblestone Heather (Colour A).
- 1 Skein Garnet Heather (Colour B).
- Size 4 (3.5 mm) and Size 8 (5 mm) 16” circular knitting needles.
- Size 8 (5 mm) double pointed knitting needles.
- Stitch Marker.
- Scissors.
- Yarn needle.
Pattern PDF File
The free knitting pattern for this buffalo plaid hat is available right here on this page, as this site is sustained through ad support.
If you’d like your own copy, the Ad-Free PDF file (which will be emailed to you automatically) can be purchased through Ravelry, or by clicking the “Purchase PDF File” button to the right.
Thank you so much for your support! It means the world to me, and I’m beyond grateful to be able to share my passion with you all.
Size:
Adult (head circumference 22 inches).
Gauge:
21 stitches, 22 rows = 4 Inches in stockinette stitch with size 8 (5mm) knitting needles.
Abbreviations:
K: Knit
P: Purl
K2Tog: Knit Two Together decrease
Notes:
This hat is knit in the round on circular knitting needles, switching to double pointed needles when necessary during the decreasing of stitches for shaping the top.
When working the stranded stitches, always hold the non-dominant color to the left, and the dominant color to the right. As a result, the yarn held to the left will produce a slightly larger stitch than the yarn held to the right; which will ensure the stitches are consistent in size and also make the non-dominant color pop.
For those of you that are new to stranded knitting, I have also created a bonus video on stranded knitting, which shows you how I hold the yarn and switch colours.
Pattern:
Using size 4 (3.5mm) circular needles and color A, cast on 100 stitches. Place stitch marker to mark the beginning of the round and then join (being careful not to twist the stitches).
Rounds 1-18: *k1,P1; repeat from * to end of round to create 1X1 ribbing for the brim of the hat.
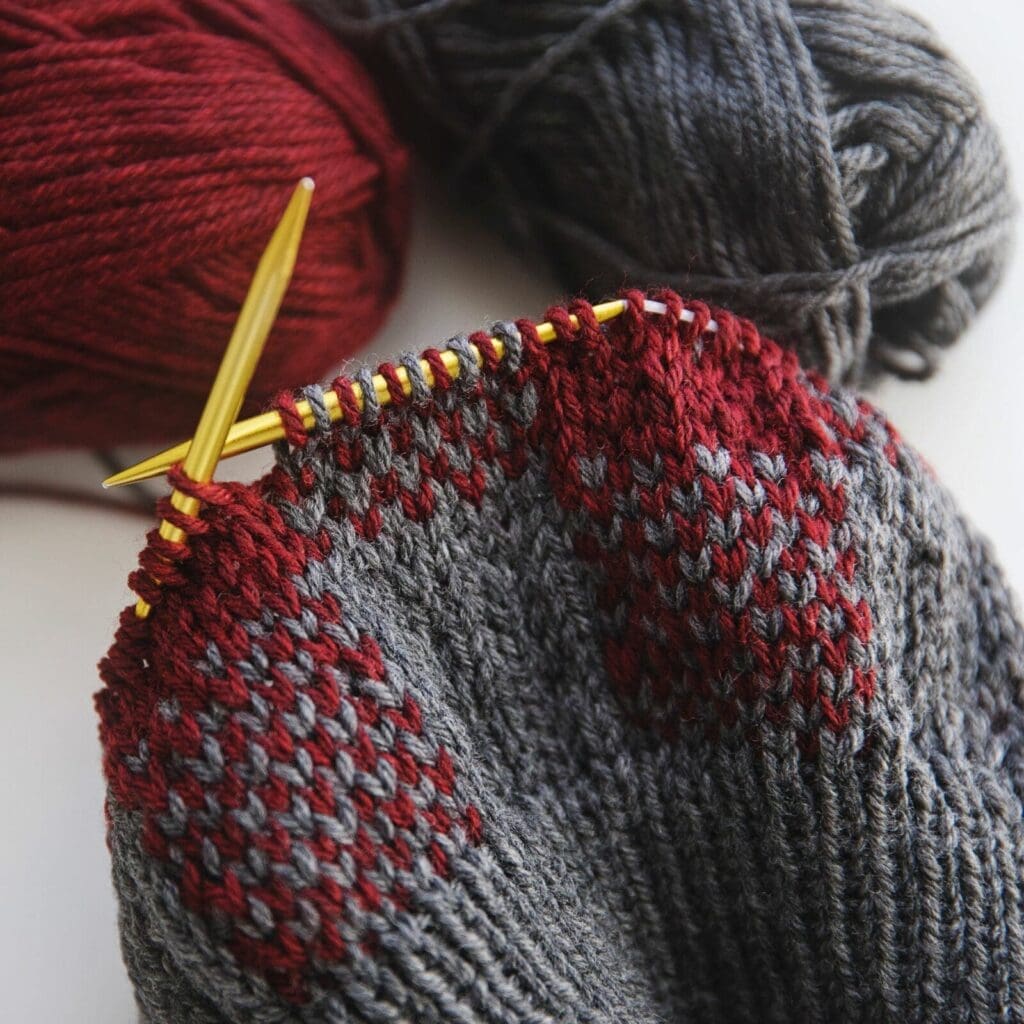
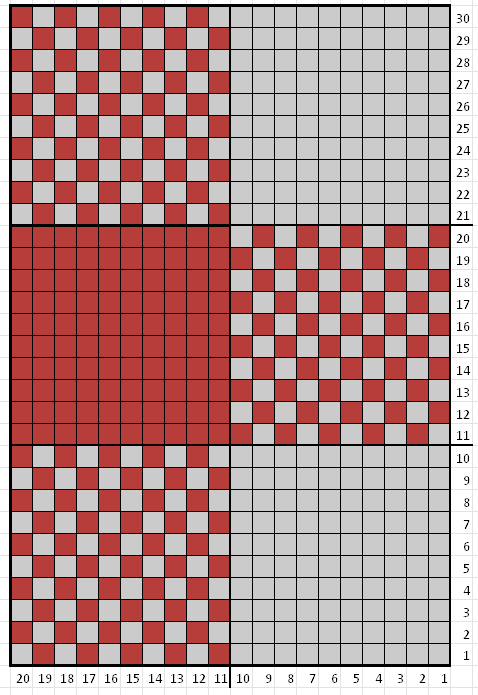
Slip stitches onto size 8 (5mm) circular needle to knit the remainder of the hat. Note that the remainder of the hat is knit in stockinette stitch (knit all stitches). Follow the colour chart below by repeating stitches 1-20 five times per round for the next 30 rounds. Colour A is represented by the grey squares, and colour B is represented by the red squares.
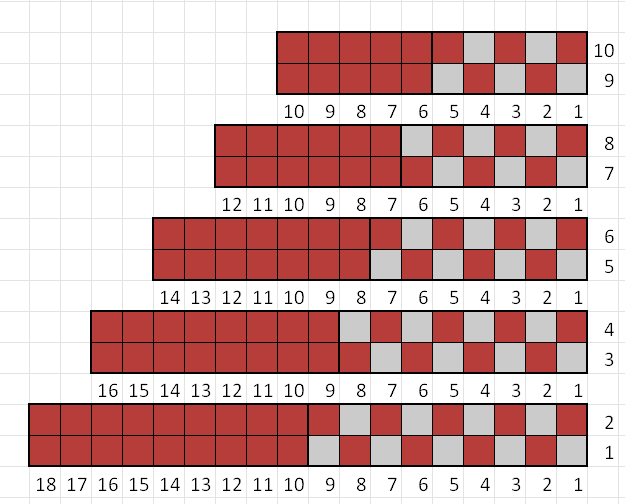
This is where we start decreasing, which will shape the top of the hat (you can switch to double pointed needles when necessary). Follow Rounds 1-10 and colour chart below.
Decreasing Rounds:
Round 1: *K8, K2Tog; repeat from * to end of round (90 stitches remain).
Round 2: Knit all stitches.
Round 3: *K7, K2Tog; repeat from * to end of round (80 stitches remain).
Round 4: Knit all stitches.
Round 5: *K6, K2Tog; repeat from * to end of round (70 stitches remain).
Round 6: Knit all stitches.
Round 7: *K5, K2Tog; repeat from * to end of round (60 stitches remain).
Round 8: Knit all stitches.
Round 9: *K4, K2Tog; repeat from * to end of round (50 stitches remain).
Round 10: Knit all stitches. Continue to Finishing.
Finishing:
Cut yarn (leave a long tail) and pull through yarn needle. Thread through the remaining stitches and pull tight. Secure and weave in ends.
Finally, attach a pompom to the top of the hat with a yarn needle.
Pattern PDF File
I hope you enjoyed this free buffalo plaid hat knitting pattern.
If you’d like your own copy, the Ad-Free PDF file (which will be emailed to you automatically) can be purchased through Ravelry, or by clicking the “Purchase PDF File” button to the right.
Thank you so much for your support! It means the world to me, and I’m beyond grateful to be able to share my passion with you all.



Thank you for a beautiful pattern, the hat is gorgeous and the pretty socks would be great paired with it as a Christmas gift in matching yarns.
Your directions are fun and easy to follow and the tutorials are very well explained, your tips really make a difference to make all come out great. Again, thank you.
You are so welcome Jen!!
This is adorable and perfect for my gift list. Thank you!
You’re welcome Peggy!
Hi, Love this pattern and the tutorial on stranded knitting was very helpful and gave me the courage to try it. However the pattern is for an adult circumference of 22 ” and I have found 19″ works for me. How would I downsize the pattern to fit?
HI Patricia, I suggest going down half a needle size to make the hat a bit tighter.
I have been searching for this pattern for ages. Thanks a million for ending my search.
You’re welcome! Glad to hear 🙂
Thank you for sharing this darling pattern! I look forward to getting it on my needles!
Might I suggest, instead of changing to dpns when decreasing, using a second circular needle.
I found the ‘Buffalo Plaid’ hat accidentally… such a happy accident. I found your pattern well written, and thought it very generous of you to offer it freely. Thank you.
Great suggestion! Thank you!
Love the pattern, have the yarn and can’t wait to begin. Is the size mentioned, 22″ , the finished hat circumference or the actual head size of an adult? Thanks.
Hi Alexis, I’m referring to the circumference of the head. The hat will be less since it stretches.
I love your pattern! I would like to make it larger… I began to knit it and sadly it’s too tight ?.
Should I add more stitches, and if so, how much? Or use bigger needles? I’m a little confused…
Thank you very much and again, beautiful pattern!
Hi Nadine. I would just use bigger needles and follow the patter as it is. This will result in a slightly larger and more stretchy hat.
I just made this toque and I want to thank you very much for the pattern. I hadn’t knit in years so there are a few mistakes in my toque but your pattern was very easy to follow and my toque is complete with a black fur pompom.
That’s so wonderful to hear Ashely! I’m glad that you are enjoying knitting again!
I made this hat and it came out perfect. Your video tutorial is very helpful. I made this hat for me and my daughters. Thank you.
Hello! Thank you so much for the beautiful pattern, I’m looking forward to making it 🙂 I want to make my hat with a double brim, can I use the this exact same pattern or do you suggest any adjustments? Thank you!
Hi San, Yes I think it should be fine as it is. I haven’t tried it myself however.
This is beautiful. I’m making hats for a school in Alaska. Do you have the pattern in a child-size?
Thank you for an awesome and very educational video. I learned a great deal and a much easier way to change colors. Thank you for sharing your knowledge and gift. Hugs
You’re most welcome! Thank you for leaving such a kind review ❤️
Do you have this in a child’s size ?
I’m sorry, I only wrote and tested this pattern in the adult size.
LOVE this pattern. Do you have a preferred cast on for this hat? Thank you for this really sweet pattern.
Thanks Anne! I just use a long tail cast on 🙂
Me gusto mucho este patrón y aunque mi estilo de tejer es estilo inglés intentaré hacerlo igual. Y también me gustaría aplicar este punto para realizar una manta. Muchas gracias por compartirlo y saludos desde el sur de Argentina !
Thank you so much!! Such a beauty!!
I’m curious about your pom pom…
It looks so perfect! Any tips to making one just as beautiful
Hi Maureen, here is a tutorial on how to make the perfect pom pom that I love: https://www.youtube.com/watch?v=zok9hqyhTQ4
First time knitting on circular needles and this pattern was so simple!!!
What other yarn could I use if cannot purchase the yarn specified?
Hi Jill, You could use any worsted with yarn, but I recommend using one that is 100% wool, as I find it works best for colour work. If you’re looking for a recommendation, Knit Picks has a fantastic line called Wool of the Andes. It’s quite similar in thickness to what you might be considering and is also more budget-friendly. I’ve had great success with it and think you might too!