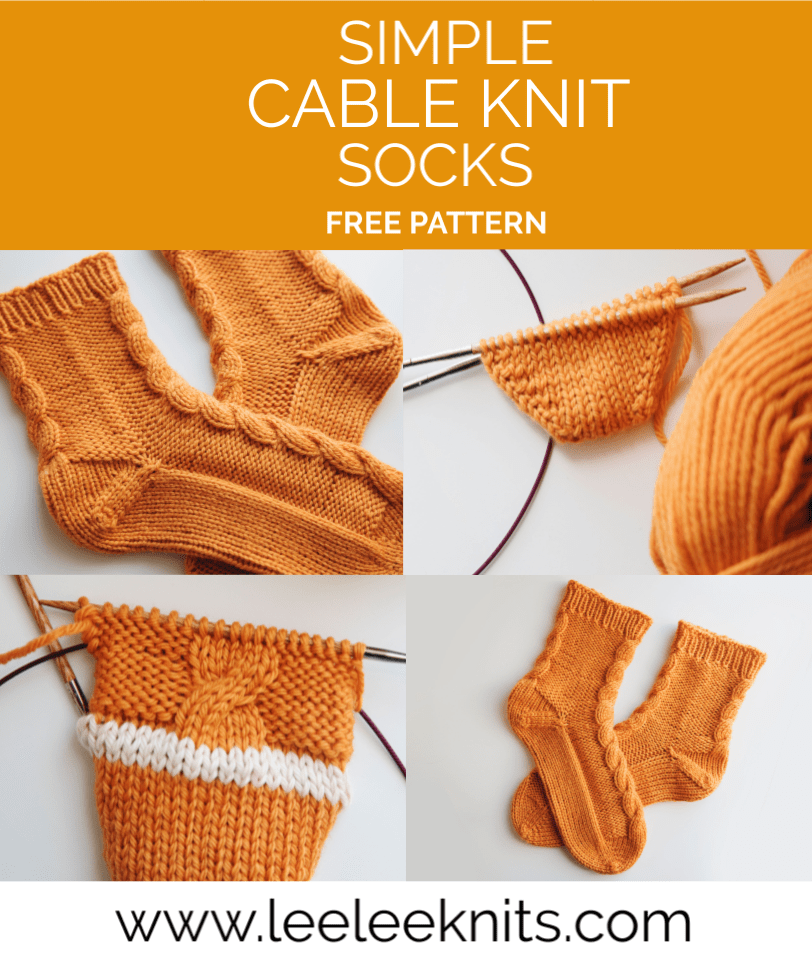
I know that I just posted a sock pattern, but I can’t help it! I’m sock crazy right now. There’s something about autumn that makes me obsess over keeping my family’s toes toasty warm.
With these socks, I wanted to incorporate cables, but keep the pattern simple and easy to follow. I came up with an easy design that has one cable going up the top of the foot, and another at the back of the leg. The heel and bottom of the foot are worked in stockinette stitch since that is the most comfortable stitch to walk on.
If you’re new to knitting socks, I would suggest starting with my Cozy Slipper Socks, since they are made solely in stockinette stitch (with some ribbing at the cuff), and then once you have some practice under your belt, move on to these.
[wc_divider style=”solid” line=”double” margin_top=”” margin_bottom=”” class=””][/wc_divider]
I have written out and posted the free pattern for these toasty warm cabled socks below on this page.
You may also purchase the ad-free instant download PDF file for easy printing and reading. Purchasing the PDF file helps to support this website and allows me to continue to share my patterns and inspiration with you.
Should you have any issues with the download, please email: info@leeleeknits.com for assistance.
You can Purchase the PDF file (which will be emailed to you automatically after purchase) for $5 USD through Ravelry or by clicking the button below.
[wc_divider style=”solid” line=”double” margin_top=”” margin_bottom=”” class=””][/wc_divider]


Please note that some of the links on this page are affiliate links and I will earn a commission if you purchase through these links. I use all of the products listed on this page and recommend them because they are companies that I have found helpful and trustworthy. Please let me know if you have any questions about anything I have recommended!
Materials:
Here is what you will need to make a pair of these warm, cozy cable knit socks:
- Size 6 (4 mm) circular knitting needles
- 2 skeins of Knit Picks Swish worsted weight yarn in Clementine.
- Scissors.
- Yarn Needle.
- Ruler or tape measure.
- Sock Blocker (optional).


Size:
Width is for a typical Adult Female Foot. Length of foot can be customized in pattern.
Gauge:
5.5 stitches, 6.5 rows = 1″ in stockinette stitch.
Abbreviations:
K: Knit
P: Purl
K2Tog: Knit Two Together decrease
SSK: Slip, Slip, Knit decrease
C6B: Cable 6 Back (slip 3 stitches onto your cable needle to the back of your work, knit the next three stitches, then knit the three stitches off of the cable needle).Kfb: Knit Front and Back increase
Notes:
These socks are worked from the toe up, using the Magic Loop technique and circular 32″ knitting needles.
You will need to know the following techniques to knit these socks. If you do not know these techniques, please follow the links and read/watch the tutorials before you begin.
Magic Loop Technique for knitting in the round
Placing and Picking up Stitches for an Afterthought Heel
Pattern:
Toe:
Using Judy’s Magic Cast On, cast on 16 stitches (8 stitches on each needle).
Round 1:
Knit all stitches.
Round 2:
On each needle: K1, kfb, knit to last 2 stitches, kfb, k1 (increased a total of 4 stitches).
Repeat rounds 1 and 2 until you have 20 stitches on each needle (total of 40 stitches).
Continue to Foot.


Foot:
Repeat the following 8 rounds until your work measures close to 2 inches less than the length of the foot (length of foot is from top of toes to end of heel). The remaining 2 inches will be made up when you work the heel. For example, my feet measure 9.5 inches, so I work the foot until the total length is about 7.5 inches long (including the toe part). Continue to Heel Placement.
Rounds 1 – 6:
P7, K6, P7 on the first needle (top of foot).
Knit all 20 stitches on second needle (bottom of foot).
Round 7:
P7, C6B, P7 on first needle (top of the foot).
Knit all 20 stitches on second needle (bottom of foot).
Round 8:
P7, K6, P7 on the first needle (top of foot).
Knit all 20 stitches on second needle (bottom of foot).
Heel Placement:
This pattern uses the afterthought heel technique. This requires using some waste yarn to hold the placement of the heel so that the rest of the sock can be completed before coming back to finish the heel.
To place the afterthought heel: P7, K6, P7 across Needle 1 (top of the foot). Note that this is a repeat of round 1 from the foot.
The stitches on Needle 2 are for the bottom of the foot. This is where we use the waste yarn to hold the heel stitches until we can come back to work the heel. Let go of your working yarn (leave it attached) and knit with the waste yarn across Needle 2. Turn your work and purl back to create another row, and then turn and knit one more row so that you have 3 rows with the waste yarn to hold the stitches for the heel. Cut your waste yarn, leaving a bit of a tail.
The stitches must now be transferred back to the left needle so that you can continue to work in the round. Slip each stitch back onto left needle and pick up the working yarn. Knit across Needle 2 to complete the round. You now have one round complete that holds the stitches for the heel and can continue on to work the Leg of the sock.
Leg:
P7, K6, P7 across Needle 1 (top of the foot). Note that this is a repeat of round 2 from the foot.
Knit all 20 stitches on second needle (bottom of foot).
At this point, the top and bottom needle will be the same for the rest of the leg. Starting on Round 3, continue to knit the following rounds four times (or desired length). Continue to Cuff.
Rounds 1 – 6:
P7, K6, P7 on each needle.
Round 7:
P7, C6B, P7 on each needle
Round 8:
P7, K6, P7 on each needle.


Cuff:
Work 8 rounds of K1, P1 ribbing. Bind off in pattern using Russian Bind Off technique.
Heel:
Hold the sock so that the toe end is facing you, and the cuff is facing away from you.
Pick up the stitches back onto your needle by inserting each needle under the front leg of each stitch directly under/over the waste yarn stitches. Carefully remove the waste yarn


Knit one round, adding two extra stitches on each end to close the gaps (knit into the stitches below the gaps). There are now 22 stitches on each needle, so we need to decrease back to the original 20 stitches on each needle.
Decrease the extra two stitches in the next round.
Needle 1: K2Tog, K2Tog, Knit the remaining stitches (20 stitches).
Needle 2: K2Tog, K2Tog, Knit the remaining stitches (20 stitches).
Continue to Shaping the Heel.
Shaping the Heel:
Round 1:
On each needle: K1, SSK, knit to last 3 stitches, K2Tog, K1 (decreased a total of 4 stitches).
Round 2:
Knit each stitch.
Repeat rounds 1 and 2 until there are 10 stitches remaining on each needle (total of 20 stitches).
Cut the yarn, leaving an 8-10 inch tail and graft the stitches together using the Kitchener Stitch. Secure and weave in all loose ends. Wet socks, and place over sock blocker to dry into shape (optional).


[wc_divider style=”solid” line=”double” margin_top=”” margin_bottom=”” class=””][/wc_divider]
I hope you enjoyed this free pattern and I am so grateful for your support! Don’t forget that you can purchase the ad-free PDF file. Purchasing the PDF file helps support this website and allows me to continue to share my patterns and inspiration with you guys!
Should you have any issues with the download, please email: info@leeleeknits.com for assistance.
You can Purchase the PDF file (which will be emailed to you automatically after purchase) for $5 USD through Ravelry or by clicking the button below.
[wc_divider style=”solid” line=”double” margin_top=”” margin_bottom=”” class=””][/wc_divider]


5 Responses
I check out all your free patterns but would love to knit a pair of socks cuff down, it really familiar with toe up socks, in fact I have only made one pair of socks before and that was a long time ago.
Hi Yvonne, thanks for the comment! I will try to get a cuff down pattern up soon!
Merci pour ce magnifique patron , je n’ai jamais tricoté des bas en commençant par le bout du pied, je débute toujours par la jambe, mais comme tout m’intéresse je vais essayer ton beau modèle, Merci beaucoup de partager.
Question — does this pattern really only require 220 yds of the named yarn? Seems a little skimpy, especially with the cabling. Please advise, and thank you for posting this!
Yes, its a ticker yarn so you don’t need as much