
Crochet This Chunky Hat in No Time!
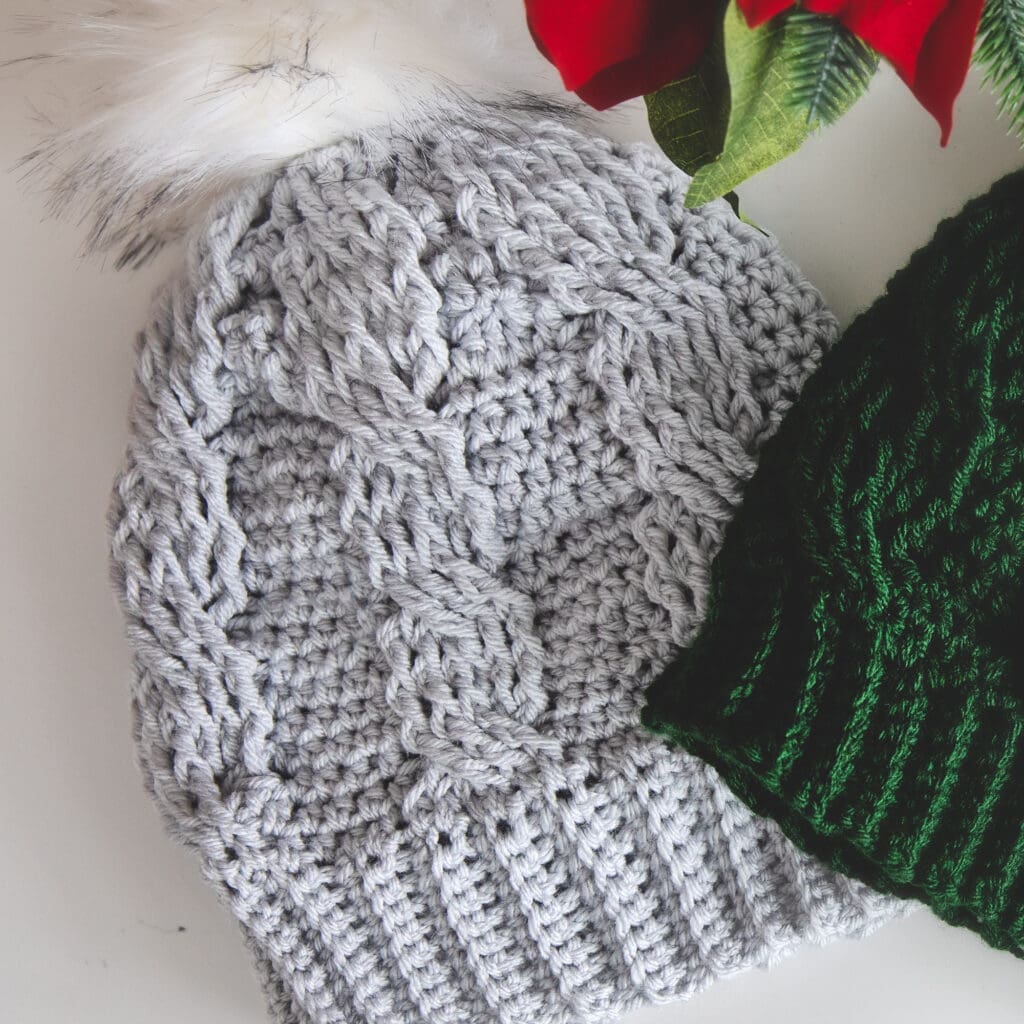
One of the best parts about crochet is how quick it can be to work up chunky, warm winter accessories. You don’t need a ton of time to set aside, and if you make a mistake it’s no biggie to take a couple of steps bak and try again. That’s why I’m so excited to share this ultra-cozy chunky crochet hat pattern with you today!
Not only is this chunky crochet hat a quick and fun project to whip up, but it’s also stylish enough to keep you warm and looking great during the chilly winter months. And the best part? This hat makes the perfect handmade gift for the holiday season—because who wouldn’t love a cozy, one-of-a-kind present made with love?
Love This Pattern? Pin It and Share!
I hope you enjoy this pattern as much I did creating it! Please feel free to share the link to this page on your social media or Pinterest account.
I truly appreciate all of you who get the word out about this site and my patterns!
❤️ Alnaar
[apsp-pin-image image_url=’https://www.pinterest.ca/pin/480618591503691312′]
How this Crochet Hat is Constructed
I designed this chunky hat to be crocheted in the round to make it extra simple and eliminate the need for seaming. Here’s a quick overview of how it comes together (the full pattern can be found by scrolling down further of course!):
- Start with the brim: The hat begins by creating a ribbed brim. You’ll work rows of single crochet in the back loop to form a long, stretchy ribbed fabric. Once complete, the ends of the brim are slip-stitched together to form a band.
- Work the body in the round: The body of the hat is crocheted directly onto the brim, working in the round. Chunky crochet cables are added using front post triple crochets, crossed to create the beautiful texture.
- Shape the crown: The crown is gradually shaped by decreasing stitches along the top rounds, giving the hat a snug, comfortable fit.
- Add a finishing touch: Once the hat is complete, you have the option to top it off with a fun pom-pom for an extra cozy look.
Please note that some of the links on this page are affiliate links and I will earn a commission if you purchase through these links. I use all of the products listed on this page and recommend them because they are companies that I have found helpful and trustworthy. Please let me know if you have any questions about anything I have recommended!
Chunk Crochet Hat – Free Pattern
Materials:
Here is what you will need to make your chunky crochet hat:
- Size I-9 (5.5 mm) crochet hook.
- 1.5 skeins of Paintbox Yarns Simply Chunky 100% Acrylic Yarn (colors in photos are Misty Grey and Racing Green).
- Scissors.
- Yarn/tapestry Needle.
- Pompom (optional).
Pattern PDF File
The free pattern for this chunky cable crochet hat is available right here on this page, as this site is sustained through ad support.
If you’d like your own copy, the Ad-Free PDF file (which will be emailed to you automatically) can be purchased through Ravelry, or by clicking the “Purchase PDF File” button to the right.
Thank you so much for your support! It means the world to me, and I’m beyond grateful to be able to share my passion with you all.
Size:
One Size: Adult (head circumference 19-22 inches).
Gauge:
13 stitches X 12 Rows = 4” in half double crochet.
Abbreviations and Special Stitches:
CH: Chain
SC: Single Crochet
HDC: Half Double Crochet
STS: Stitches
BLO: Back Loop Only
Front Post Treble Crochet (FPtr): Yarn over 2 times, insert hook from front to back to front around the post of the corresponding stitch below, yarn over and pull up loop [yarn over, draw through two loops on hook] 3 times.
Free Chunky Hat Crochet Pattern:
Hat Brim:
The brim is worked flat and then the ends are joined together.
Row 1: CH10, SC in second ch from hook and in each remaining ch, turn (9 sts).
Rows 2-54: CH1, SC in blo of each sc, turn (9 sts).
Brim will measure approximately 18 inches unstretched.
Do not fasten off. Fold brim in half, lining up stitches of foundation chain row and last row to form a loop. CH1 and seam ends together by slip stitching through stitches of the foundation chain row and last row (blo). Continue to Body of Hat.

Body of Hat:
The body of the hat is worked in the round along the brim that was just completed.
Round 1: CH 2 (does not count as a stitch); working around the brim, HDC 60 stitches evenly spaced and join to first HDC with a slip stitch (60 sts).
Round 2: CH 2 and work one HDC in each stitch (including first one) all the way around. Join to first HDC with slip stitch (60 sts).
Round 3: CH2; *HDC in next 4 hdc, skip next 3 hdc, work FPtr around hdc one row below next 3 hdc; working in front of FPtr just made, work FPtr around hdc one row below the 3 skipped hdc; repeat from * until the end of the round. Join to first HDC with slip stitch (60 sts).

Round 4: CH2 and work one HDC in each stitch all the way around. Join to first HDC with slip stitch (60 sts).
Round 5: CH2; *HDC in next 4 hdc, work FPtr around next 6 FPtr; repeat from * until the end of the round. Join to first HDC wiwth slip stitch (60 sts).
Round 6: CH2 and work one HDC in each stitch all the way around. Join to first HDC with slip stitch (60 sts).
Round 7: CH2; *HDC in next 4 hdc, work FPtr around next 6 FPtr; repeat from * until the end of the round. Join to first HDC wiwth slip stitch (60 sts).
Round 8: CH2 and work one HDC in each stitch all the way around. Join to first HDC with slip stitch (60 sts).
Round 9: CH2; *HDC in next 4 hdc, skip next 3 FPtr, work FPtr around next 3 FPtr; working in front of FPtr just made, work FPtr around each skipped FPtr; repeat from * until the end of the round. Join to first HDC with slip stitch (60 sts).
Repeat rounds 4-9 once more and continue to Shaping the Crown and Finishing.
Shaping the Crown and Finishing your Hat:
Round 1: CH2; *HDC in next hdc, HDC2Tog, HDC in next 7 stitches; repeat from * until the end of the round. Join to first HDC with slip stitch (54 sts).
Round 2: CH2; *HDC in next 3 hdc, work FPtr around next 6 FPtr; repeat from * until the end of the round. Join to first HDC wiwth slip stitch (54 sts).
Round 3: CH2; *HDC in next hdc, HDC2Tog, HDC in next 6 stitches; repeat from * until the end of the round. Join to first HDC with slip stitch (48 sts).
Round 4: CH2; *HDC in next 2 hdc, work FPtr around next 6 FPtr; repeat from * until the end of the round. Join to first HDC wiwth slip stitch (48 sts).
Round 5: CH2; *HDC2Tog, HDC in next 6 stitches; repeat from * until the end of the round. Join to first HDC with slip stitch (42 sts).
Round 6: CH2; *HDC in next hdc, skip next 3 FPtr, work FPtr around next 3 FPtr; working in front of FPtr just made, work FPtr around each skipped FPtr; repeat from * until the end of the round. Join to first HDC with slip stitch (42 sts).
Round 7: CH2; * HDC in next 3 stitches, HDC2Tog, HDC in next 2 stitches; repeat from * until the end of the round. Join to first HDC with slip stitch (36 sts).
Cut yarn, leaving a 10” tail.
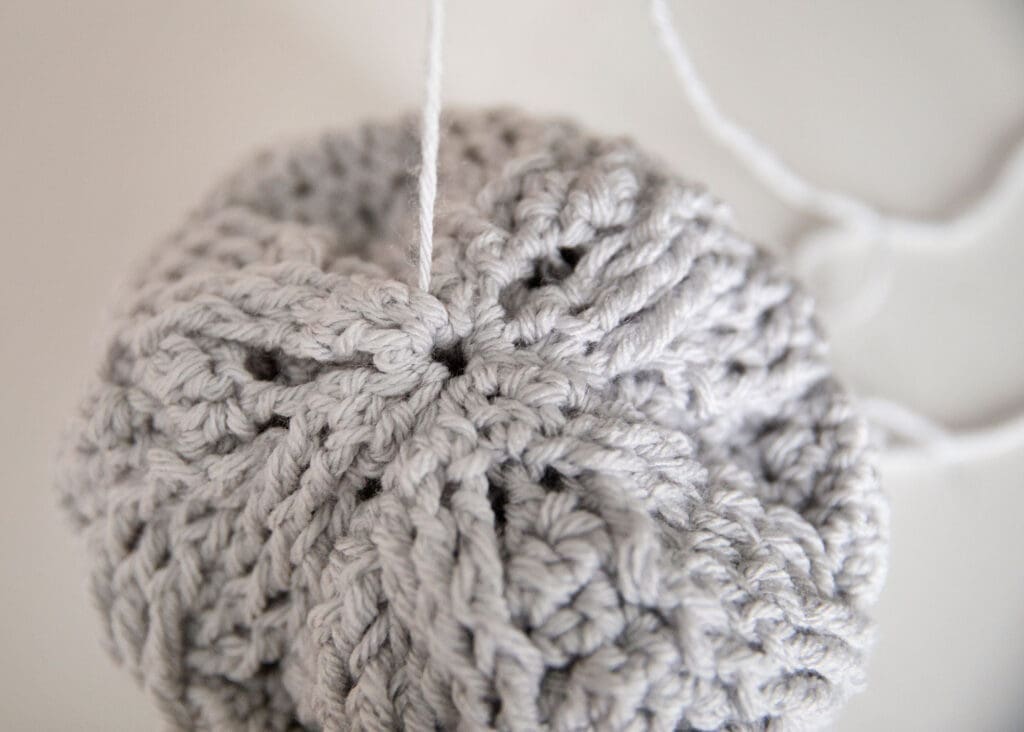
Thread yarn onto tapestry needle, and weave through front loop of all stitches. Pull tight (like a drawstring) – this will clost the top of the hat. Making sure that top of hat is completely closed, secure tail on the inside of the hat.
Attach a pompom to the top of the hat (optional) and weave in all loose ends.
Pattern PDF File
I hope you enjoyed this chunky hat crochet pattern.
If you’d like your own copy, the Ad-Free PDF file (which will be emailed to you automatically) can be purchased through Ravelry, or by clicking the “Purchase PDF File” button to the right.
Thank you so much for your support! It means the world to me, and I’m beyond grateful to be able to share my passion with you all.




21 Responses
Gorgeous. was just looking for one of these. I’m going to try it. is that you in the green hat? Thank you for writing patterns.
You’re most welcome Elaine! Yes that is me!
You are gorgeous like your work!!
Awe thank you so much!
Dear Alnaar
Thank you for your lovely patterns, you are a gifted designer and I enjoy watching your works
Edith
You’re welcome Edith! Thank you for the comment 🙂
This looks like the perfect hat for me and I am a lover of crochet. I have bought the pattern but I will have to wait till my shoulder heals.
I’m confused In round 3 of the body are you actually working 6 FPtr in between the ** Then in round 5, how do I work FPtr around the 3 (from round 3) that are behind the other 3? (If I am indeed suppose to be working 6 FPtr in round 3) Pictures or a video would be hugely helpful. I keep having to undo my work because something I’m doing isn’t quite right.
Sorry, my question is confusing even to me! ?
Hi Melissa, Try watching this video tutorial that I made on how to work a cable stitch: https://leeleeknits.com/six-stitch-cable-video-tutorial/
Hi, when shaping the crown, where it says hdc2tog in the next 7 HDC, My next 7 are not hdc but they are the fp from the prior row. I’m confused. Please help.
Round 1: CH2; *HDC in next hdc, HDC2Tog, HDC in next 7 hdc; repeat from * until the end of the round. Join to first HDC with slip stitch (54 sts).
Sorry thank you for pointing that out. Its meant to say HDC in next 7 stitches.
Hi, I’m confused again on shaping the crown. It says to fptc into the fptc but on round 2 it’s not a fptc. This means this will be off on each row thereafter as well. Can you please review this and advise? dying to finish this hat. Thanks!
Round 2: CH2; *HDC in next 3 hdc, work FPtr around next 6 FPtr; repeat from * until the end of the round. Join to first HDC wiwth slip stitch (54 sts).
Round 3: CH2; *HDC in next hdc, HDC2Tog, HDC in next 6 stitches; repeat from * until the end of the round. Join to first HDC with slip stitch (48 sts).
Round 4: CH2; *HDC in next 2 hdc, work FPtr around next 6 FPtr; repeat from * until the end of the round. Join to first HDC wiwth slip stitch (48 sts).
Round 5: CH2; *HDC2Tog, HDC in next 6 stitches; repeat from * until the end of the round. Join to first HDC with slip stitch (42 sts).
Round 6: CH2; *HDC in next hdc, skip next 3 FPtr, work FPtr around next 3 FPtr; working in front of FPtr just made, work FPtr around each skipped FPtr; repeat from * until the end of the round. Join to first HDC with slip stitch (42 sts).
Round 7: CH2; * HDC in next 3 stitches, HDC2Tog, HDC in next 2 stitches; repe
The FPDC from the row below 🙂
Perfect, thanks so much! Merry Christmas!
Merry Christmas!
So to confirm are you saying to fptc over the hdc row below down to the fptc row?
Thank you in advance!
You got it!
If I wanted to make the hat larger/smaller, what would the numbers I’d have to do that by? I’m assuming I would make the brim longer/shorter, but by how much?
Thanks!
Hi Esther, I haven’t written it up for other sizes, but I would suggest making the brim smaller than the head circumference by a couple of inches since it is stretchy. Then crochet into the brim, a multiple of 10.
Thank you!
You’re welcome!