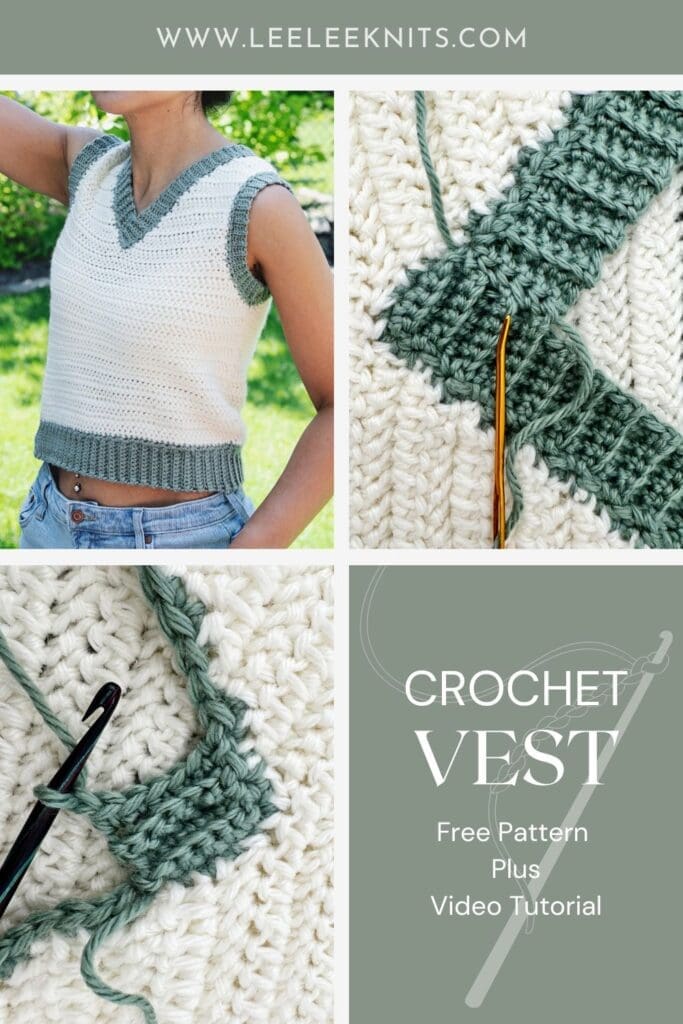
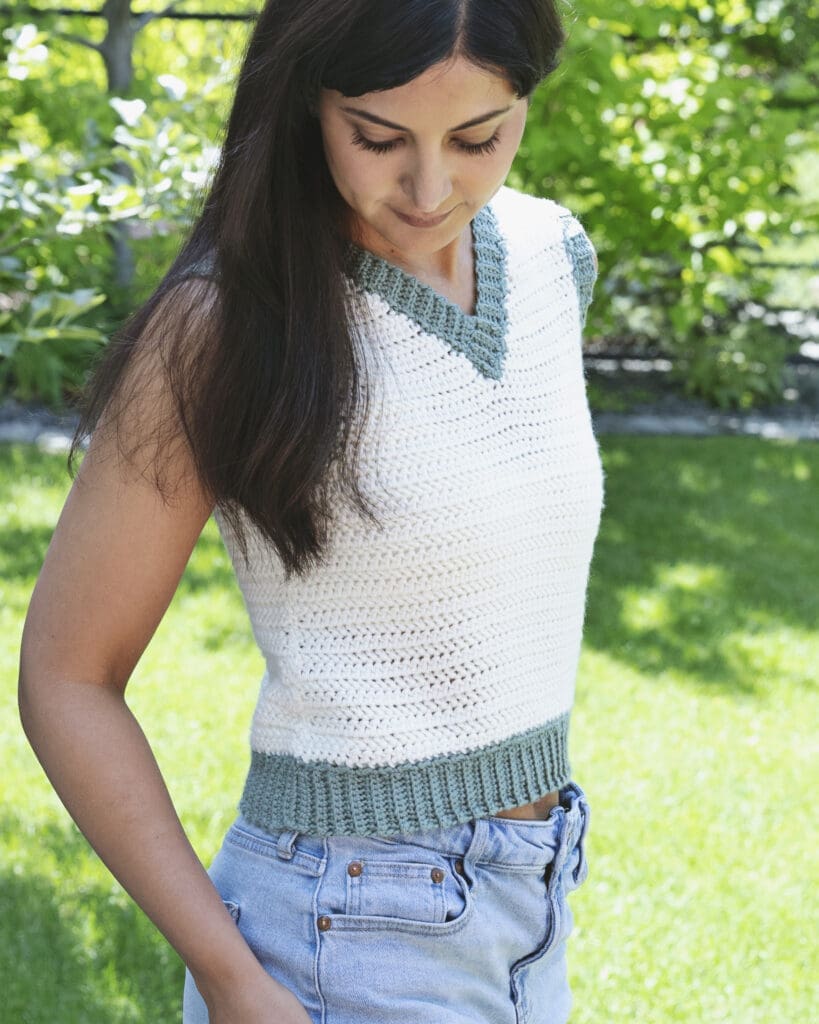
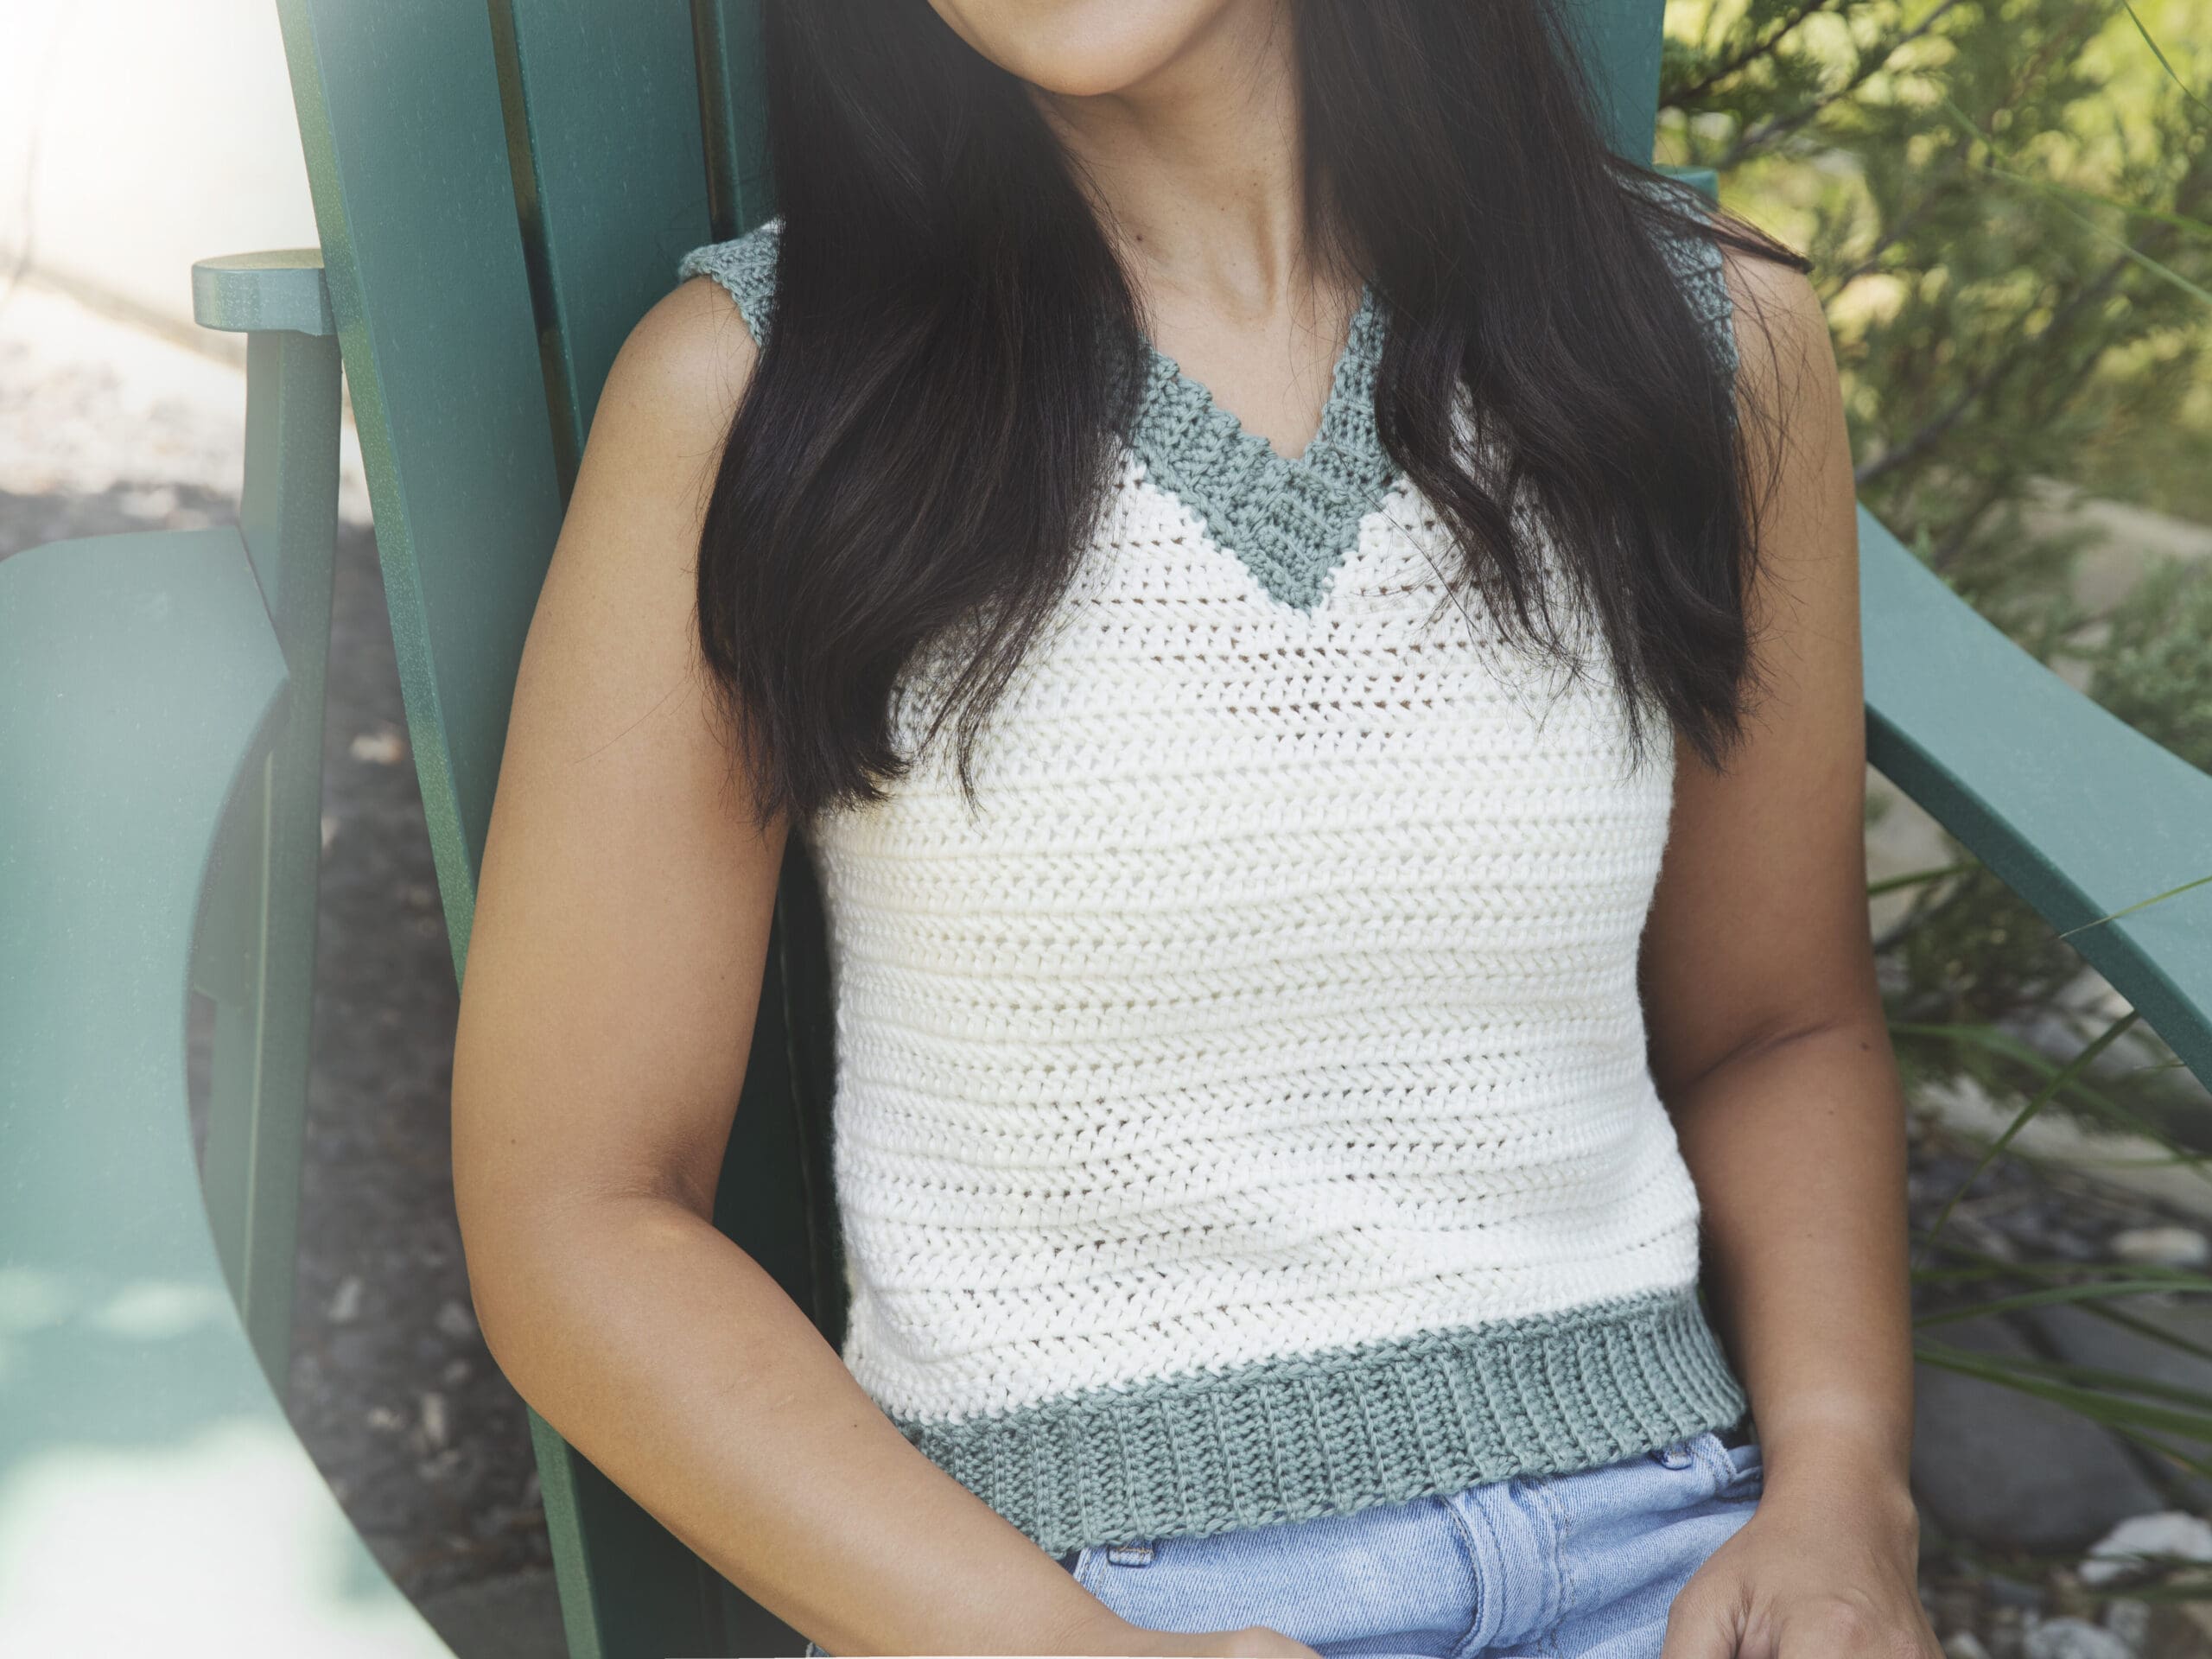
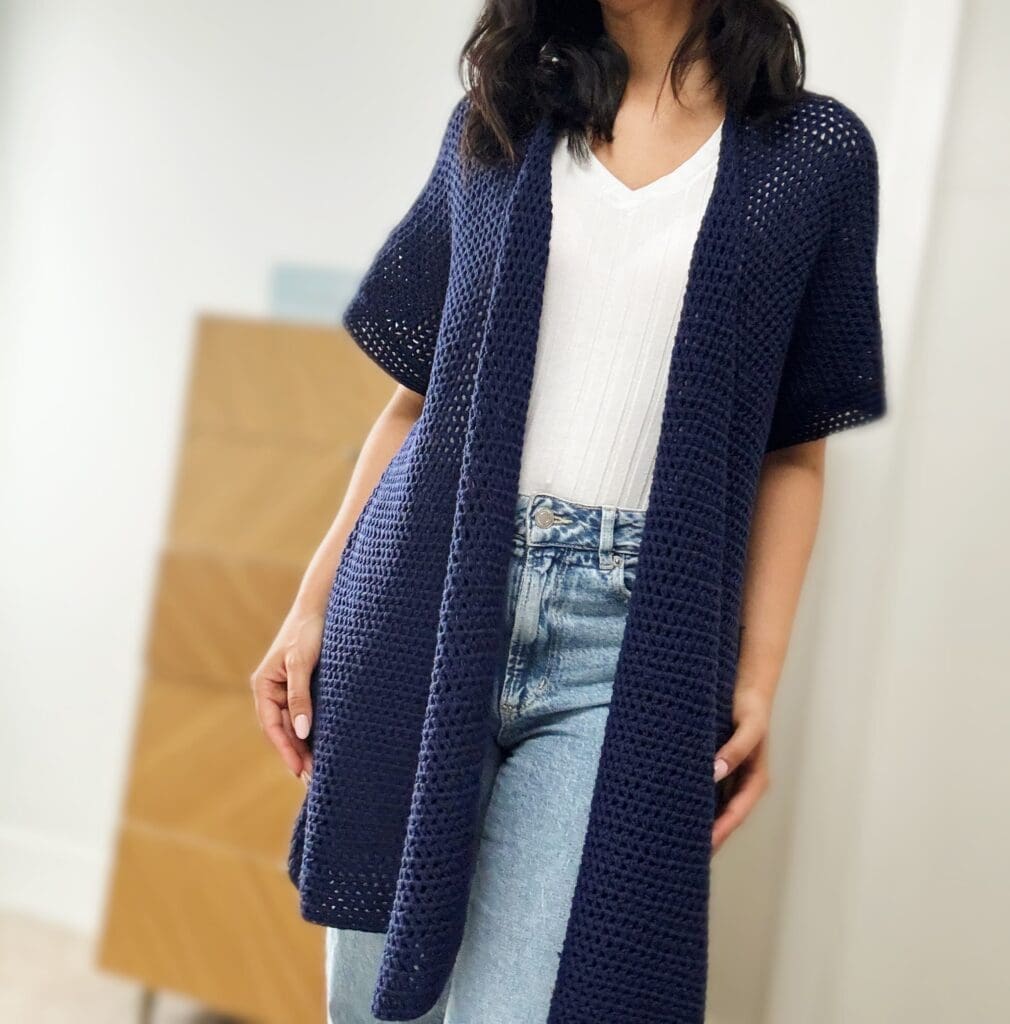
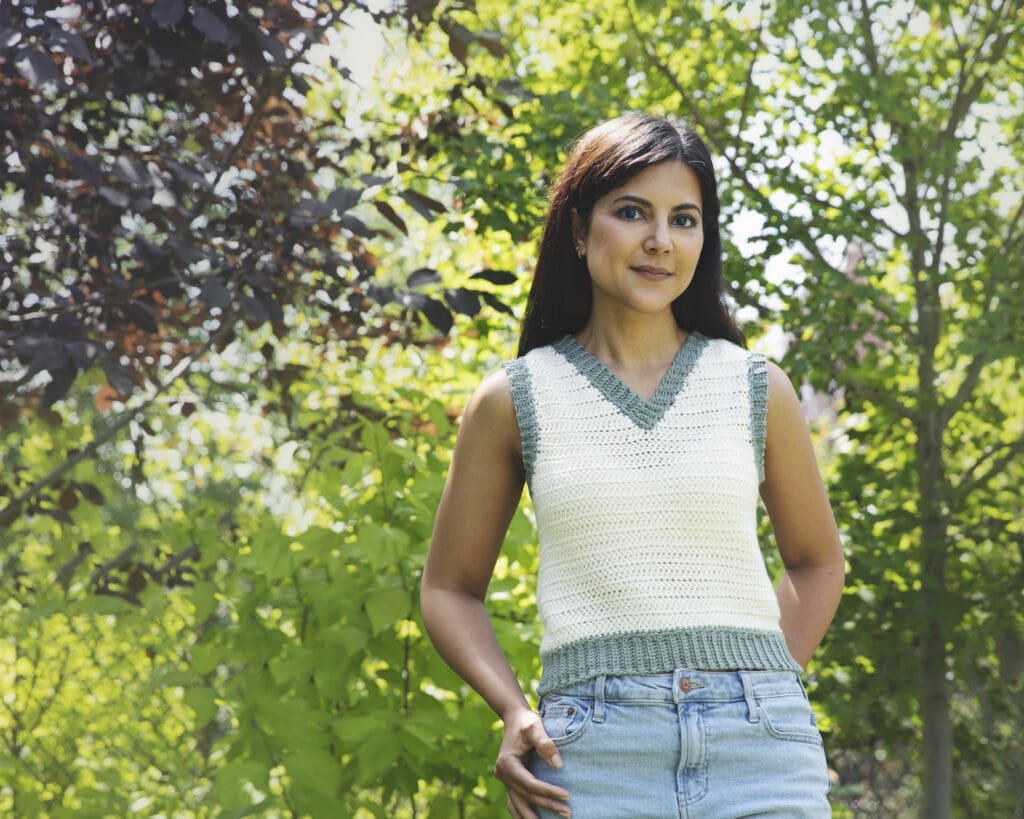
Crochet Vest Pattern
I really love to crochet my own tops because there’s something to be said about the time and effort that goes into creating your own clothing that fast fashion just can’t replace. It’s also not as hard as you’d think! I hope you will find this is true with my latest crochet vest pattern.
Pin It for Later!
I hope you enjoy this pattern! If so, please feel free to share the link to this page on your social media or Pinterest account.
I truly appreciate all of you who get the word out about this site and my patterns!
❤️ Alnaar
Easy Pattern Plus Video Tutorial
I came up with this pattern for my daughter who is going through a sweater vest phase. She has also begun to crochet which makes me so very happy!
I designed this vest to be easy enough for her to follow with her beginner crochet skills. I also know that a lot of new crocheters can be intimidated by crocheting their own clothing. I wanted this pattern to be one of those patterns that give crocheters confidence in their ability to go beyond blankets and scarves. That’s why I included lots of pictures to guide you through each step, and I even made a video tutorial and shared it to the Leelee Knits YouTube Channel. You can watch the video below, or click on the following link to see it on YouTube: Crochet Vest Video Tutorial

Please note that some of the links on this page are affiliate links and I will earn a commission if you purchase through these links. I use all of the products listed on this page and recommend them because they are companies that I have found helpful and trustworthy. Please let me know if you have any questions about anything I have recommended!
Free Crochet Vest Pattern
Materials
You will need the following materials to make this vest:
- We Crochet Mighty Stitch Worsted Weight Yarn
- Main Color: Approximately 340(360,410,450,500,580) yards.
- Contrasting Color: Approximately 130(160,200,250,310,370) yards.
- Size G/7 (4.5 mm) crochet hook.
- Scissors.
- Measuring Tape.
- Tapestry/yarn needle (for weaving in ends).
Ad Free PDF File
The free crochet pattern for this vest is available right here on this page, as this site is sustained through ad support.
If you like things a little more streamlined, I’ve put together an ad-free, downloadable PDF version of the pattern. It’s perfect for easy printing and can be can be purchased through My Ravelry Store or by clicking the “Purchase PDF File” button to the right.
Thank you so much for your support! It means the world to me, and I’m beyond grateful to be able to share my passion with you all.
Abbreviations
Ch : Chain.
CSHDC: Chainless Starting Half Double Crochet.
HDC : Half Double Crochet.
HHDC : Herringbone Half Double Crochet.
RS: Right Side of work.
SC: Single Crochet.
SCBL: Single Crochet in the Back Loop Only.
SS: Slip Stitch.
Sts : Stitches.
“ : Inches.
Gauge
14 sts X 12 rows = 4″ in HHDC.
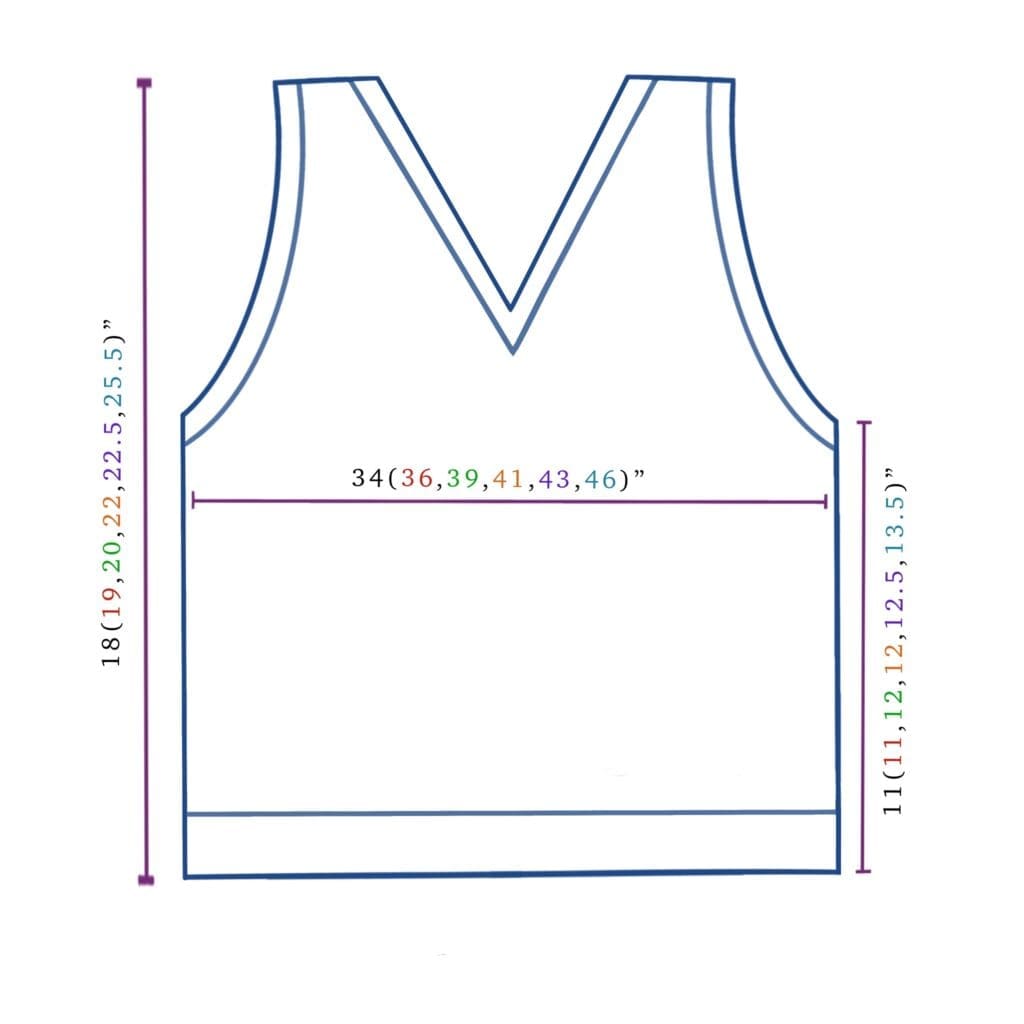
Vest Sizes
This vest is written for sizes XS(S,M,L,XL,2XL)” with corresponding bust measurements of 34(36,39,41,43,46)”. Since the vest includes a couple of inches of ease, choose the size just above your actual bust measurement. For example, if your bust is 34″, go with size small.
Crochet Vest Video Tutorial
The following video tutorial on the Leelee Knits YouTube Channel will walk you through the process of crocheting your vest: https://youtu.be/UL8SBu_lsgU.
Construction/Notes For Crocheting This Vest
- Vest is worked flat, with one back panel and one front panel.
- The panels are seamed together at the sides and shoulders.
- The bottom, armhole, and neckline ribbing are added last and worked in the round.
- Each row starts with a Chainless Starting Half Double Crochet (CSHDC)—watch the video tutorial for how-to. Alternatively, you can chain 2 (counts as a stitch) and skip the first stitch.
More Crochet Patterns from Leelee Knits!


Crochet Vest Pattern – Written Instructions
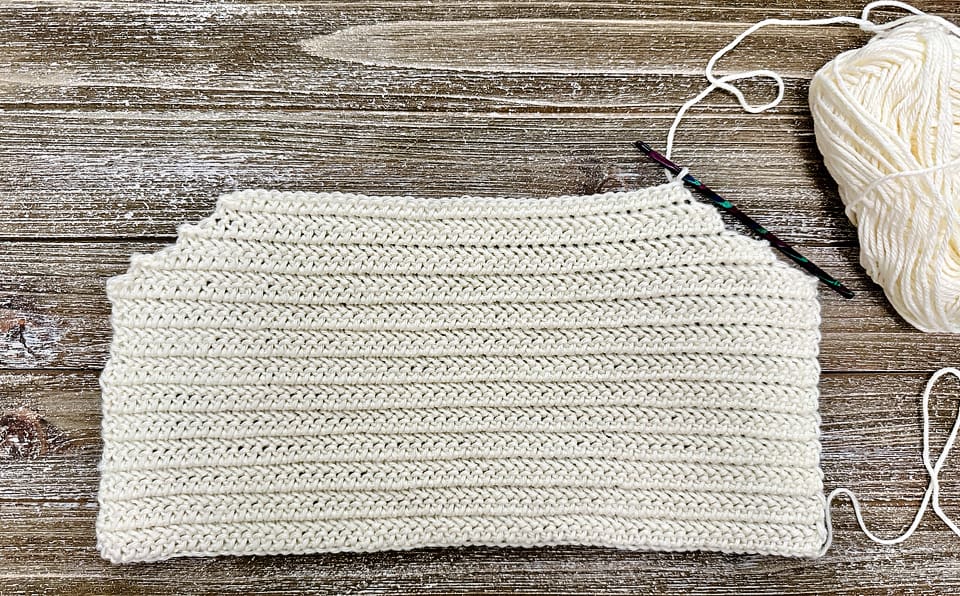
Front Panel
Chain 62(66,70,74,78,82).
Row 1: HHDC in 3rd ch from the hook. HHDC in each remaining ch across. Turn.
Count 60(64,68,72,76,80) sts.
Row 2: CSHDC in the first st. HHDC in each remaining st across. Turn.
Count 60(64,68,72,76,80) sts.
Repeat row 2 until your work measures 6.5(6.5,7.5,7.5,8,9)”, and then continue to Underarm Shaping.
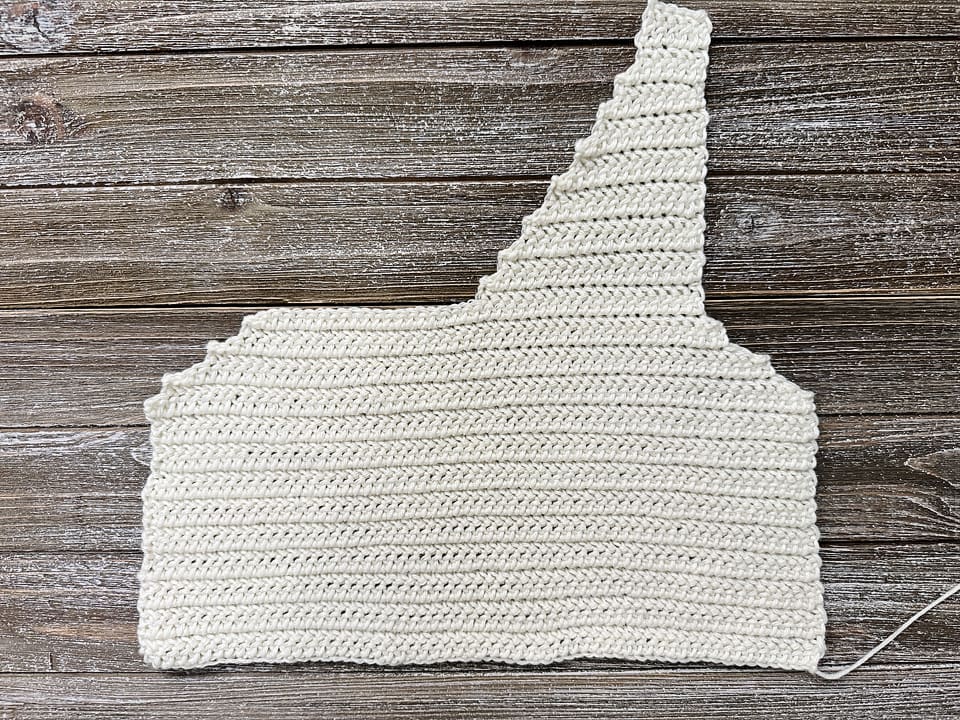
Underarm Shaping
Slip Stitches do not count as stitches when shaping the underarms and neckline.
Repeat the following row until 44(48,52,56,60,64) sts remain:
SS in the first 2 sts. HHDC in each remaining st, skipping the last 2 sts. Turn.
Note that the stitch count is reduced by 4 stitches for each repeat of the above row.
Once you have reduced the stitch count to 44(48,52,56,60,64) sts, repeat the following row twice so that 40(44,48,52,56,60) sts remain:
SS in the first st. HHDC in each remaining st, skipping the last st. Turn.
Note that the stitch count is reduced by 2 stitches for each repeat of the above row.
Do not fasten off and continue to Neckline Shaping Right Side.
Neckline Shaping Right Side
Row 1 (RS): CSHDC in the 1st st. HHDC in the next 19(21,23,25,27,29) sts. Turn.
Count 20(22,24,26,28,30) sts.
Row 2: SS in the 1st st. HHDC in each remaining st across. Turn. Count 19(21,23,25,27,29) sts.
Row 3: CSHDC in the 1st st. HHDC in each remaining st across, skipping the last st (remember that the ss doesn’t count as a st). Turn. Count 18(20,22,24,26,28) sts.
Repeat rows 2 & 3 above until 6(6,8,8,10,10) sts remain. Then repeat the following row twice: CSHDC in the first st. HHDC in each remaining st across. Turn.
Count 6(6,8,8,10,10) sts.
Fasten off and continue to Neckline Shaping Left Side.
Neckline Shaping Left Side
Row 1: With RS facing, attach yarn in the 21st(23rd,25th,27th,29th,31st) st. CSHDC in the same st. HHDC in the remaining 19(21,23,25,27,29) sts. Turn. Count 20(22,24,26,28,30) sts.
Row 2: CSHDC in the 1st st. HHDC in each remaining st across, skipping the last st.
Count 19(21,23,25,27,29) sts.
Row 3: SS in the 1st st. HHDC in each remaining st across. Turn. Count 18(20,22,24,26,28) sts.
Repeat rows 2 & 3 until 6(6,8,8,10,10) sts remain. Then repeat the following row twice:
CSHDC in the first st. HHDC in each remaining st across. Turn.
Count 6(6,8,8,10,10) sts sts.
The Front Panel is now complete! Fasten off and continue to Back Panel.
Back Panel
Chain 62(66,70,74,78,82).
Row 1: HHDC in 3rd ch from the hook, then work 1 HHDC in each ch across. Turn.
Count 60(64,68,72,76,80) sts.
Row 2: CSHDC in the first st. HHDC in each remaining st across. Turn.
Count 60(64,68,72,76,80) sts.
Repeat row 2 until your work measures 6(6.5,7,7.5,8.5,9)”, and then continue to Underarm Shaping and Upper Back.
Underarm Shaping and Upper Back
Slip Stitches do not count as stitches when shaping the underarms and neckline.
Repeat the following row until 44(48,52,56,60,64) sts remain:
SS in the first 2 sts. HHDC in each remaining st, skipping the last 2 sts. Turn.
Note that the stitch count is reduced by 4 stitches for each repeat of the above row.
Once you have reduced the stitch count to 44(48,52,56,60,64) sts, repeat the following row twice so that 40(44,48,52,56,60) sts remain:
SS in the first st. HHDC in each remaining st, skipping the last st. Turn.
Note that the stitch count is reduced by 2 stitches for each repeat of the above row.
With the underarm shaping complete, work the following row the following row 12(14,14,16,16,18) times: CSHDC in the first st. HHDC in each remaining st across. Turn.
Count 40(44,48,52,56,60) sts. Do not fasten off and continue to Neckline Shaping Right Side.
Neckline Shaping Right Side
Row 1 (RS): Make a chainless HDC in the 1st st. HHDC in the next 7(7,9,9,11,11) sts. Turn.
Count 8(8,10,10,12,12) sts.
Row 2: SS in the 1st st. HHDC in each remaining st across. Turn. Count 7(7,9,9,11,11) sts.
Row 3: Make a chainless HDC in the 1st st. HHDC in each remaining st across, skipping the last st. Turn. Count 6(6,8,8,10,10) sts.
Complete the following row twice: CSHDC in the first st. HHDC in each remaining st across. Turn.
Count 6(6,8,8,10,10) sts sts.
Fasten off and continue to Neckline Shaping Left Side.
Neckline Shaping Left Side
Row 1: With RS facing, attach yarn in the 33rd(37th,39th,43rd,45th,49th) st. CSHDC in the same st. HHDC in the next 7(7,9,9,11,11) sts. Turn. Count 8(8,10,10,12,12) sts.
Row 2: CSHDC in the 1st st. HHDC in each remaining st across skipping the last st.
Count 7(7,9,9,11,11) sts.
Row 3: SS in the 1st st. HHDC in each remaining st across. Turn. Count 6(6,8,8,10,10) sts.
Complete the following row twice: CSHDC in the first st. HHDC in each remaining st across. Turn.
Count 6(6,8,8,10,10) sts sts.
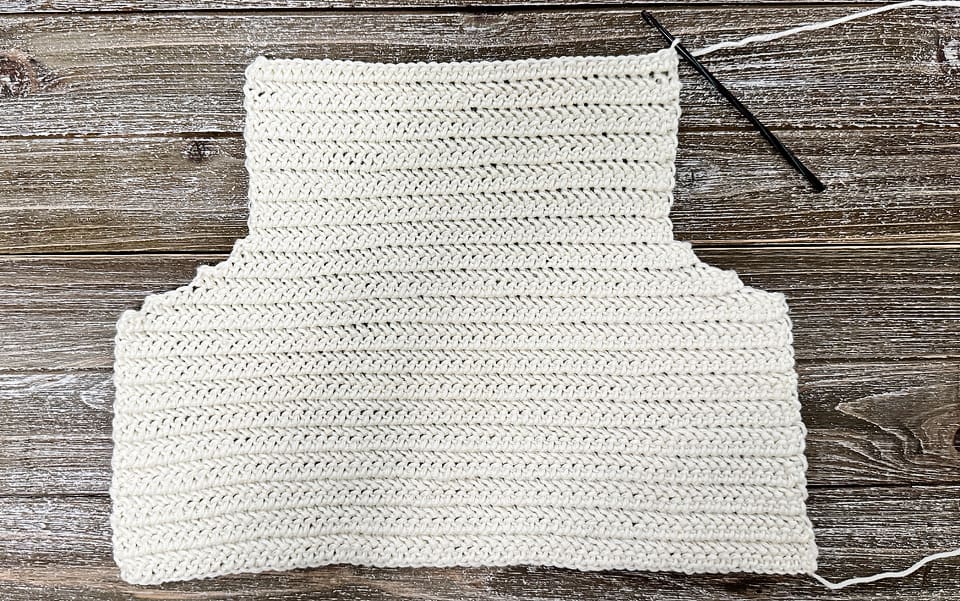
The Back Panel is now complete! Fasten off and continue to Seam Panels.
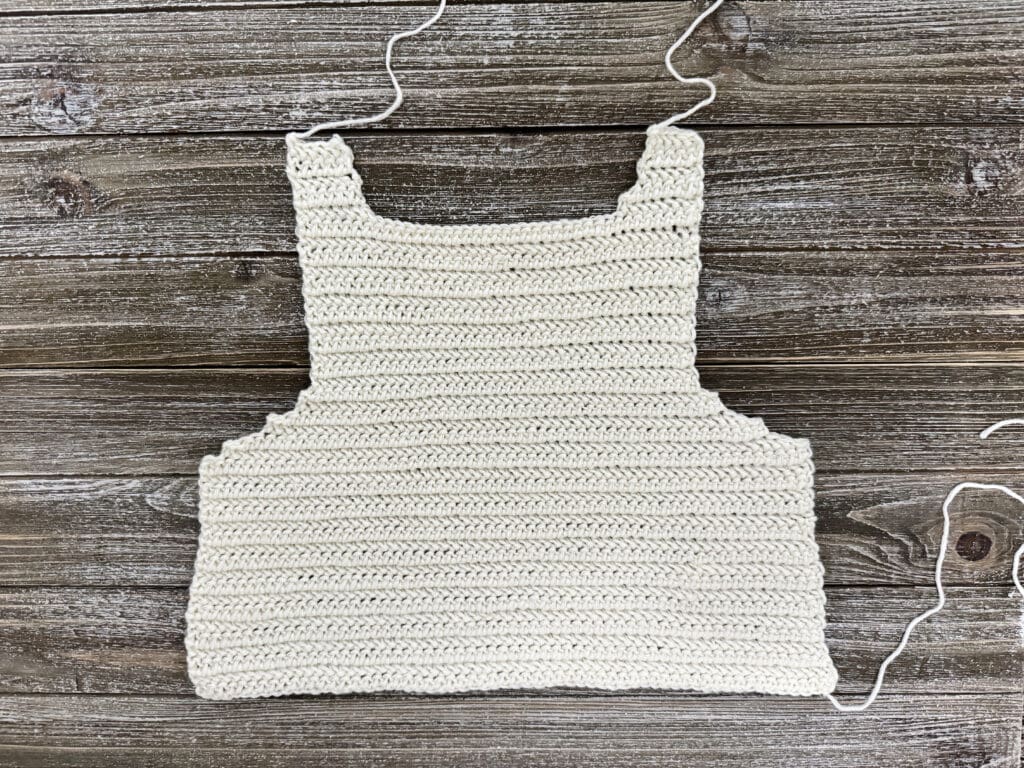
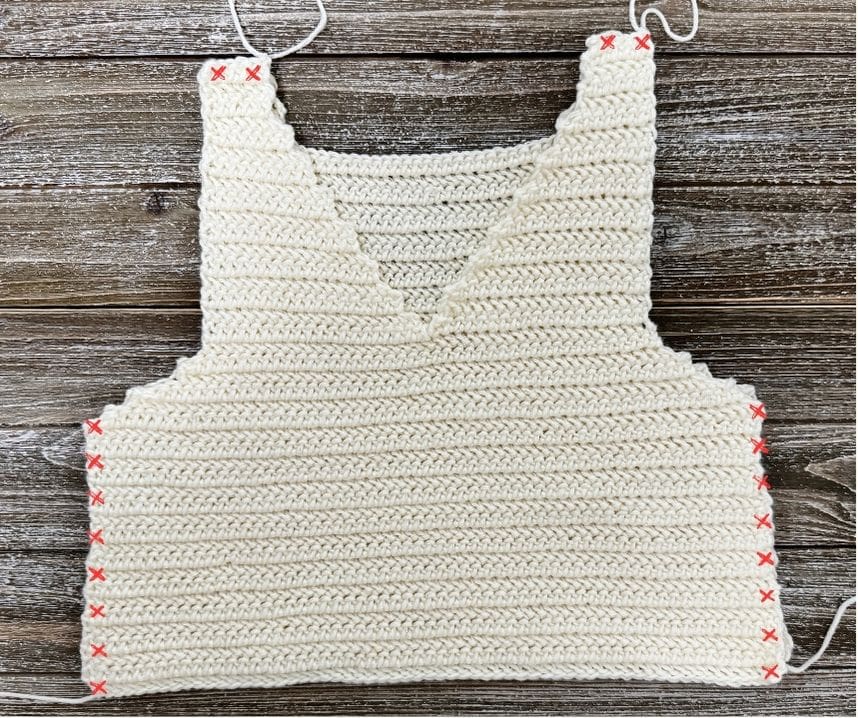
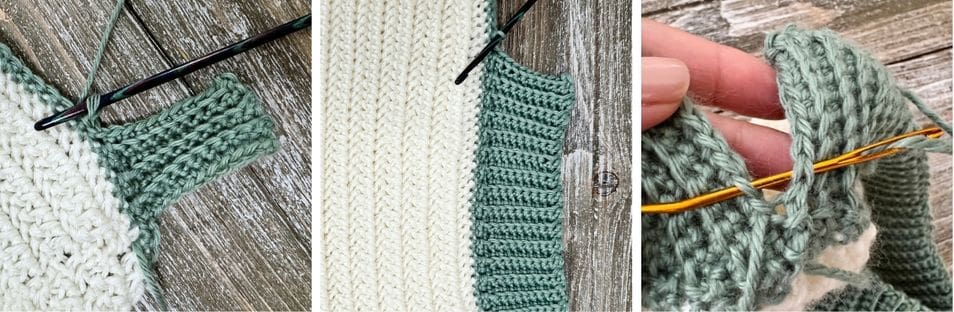
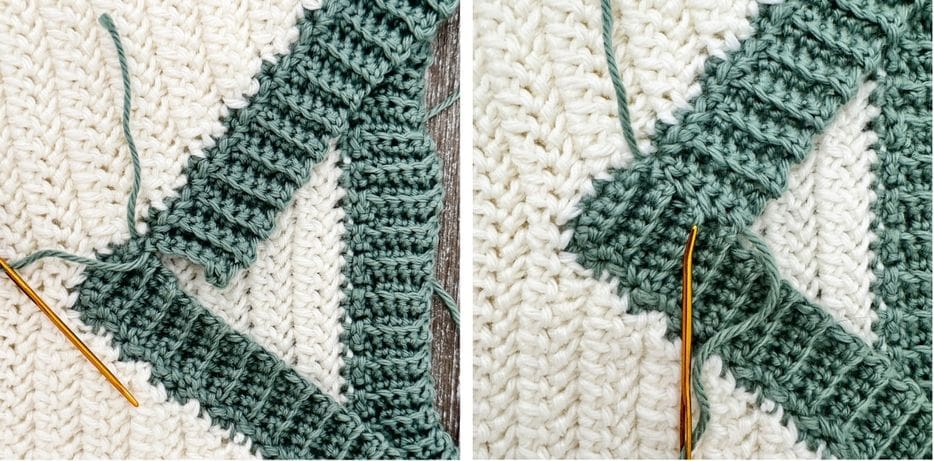
Seam Panels
Lay the front panel on top of the back panel and seam them together at the sides and shoulders with a whip stitch. The HHDC stitch is reversible, so don’t worry about which sides are facing.
Continue to Waistline Ribbing.
Waistline Ribbing
With the top inside out, join yarn in a ch next to one of the side seams.
Work the setup round as follows: CH1, SC in same st and then SC in each ch all the way around. Join to first SC with a SS.
Add ribbing by following the steps below:
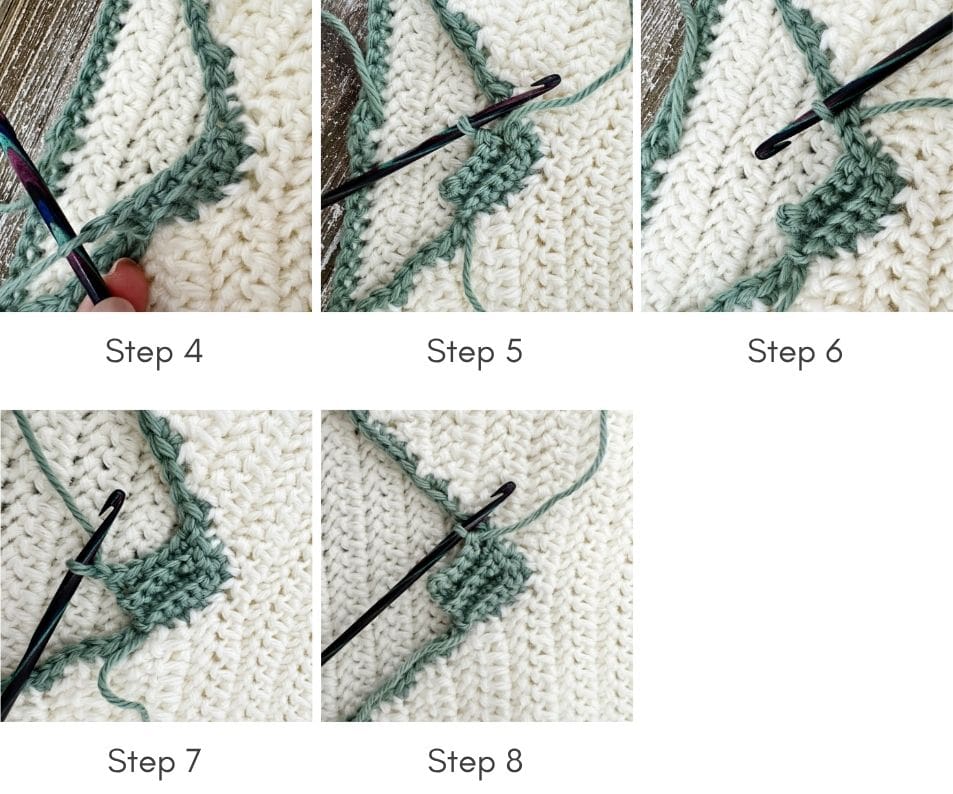
Step 1: CH11.
Step 2: SC in 2nd ch from hook and each additional ch. Count 10 sts.
Step 3: SS in the base st and the next 2 sc from the setup round. Turn.
Step 4: Skip the 3 ss, and SCBL in each of the next 10 sc. CH1 and turn.
Step 5: SCBL in each of the next 10 sc. Count 10 sts.
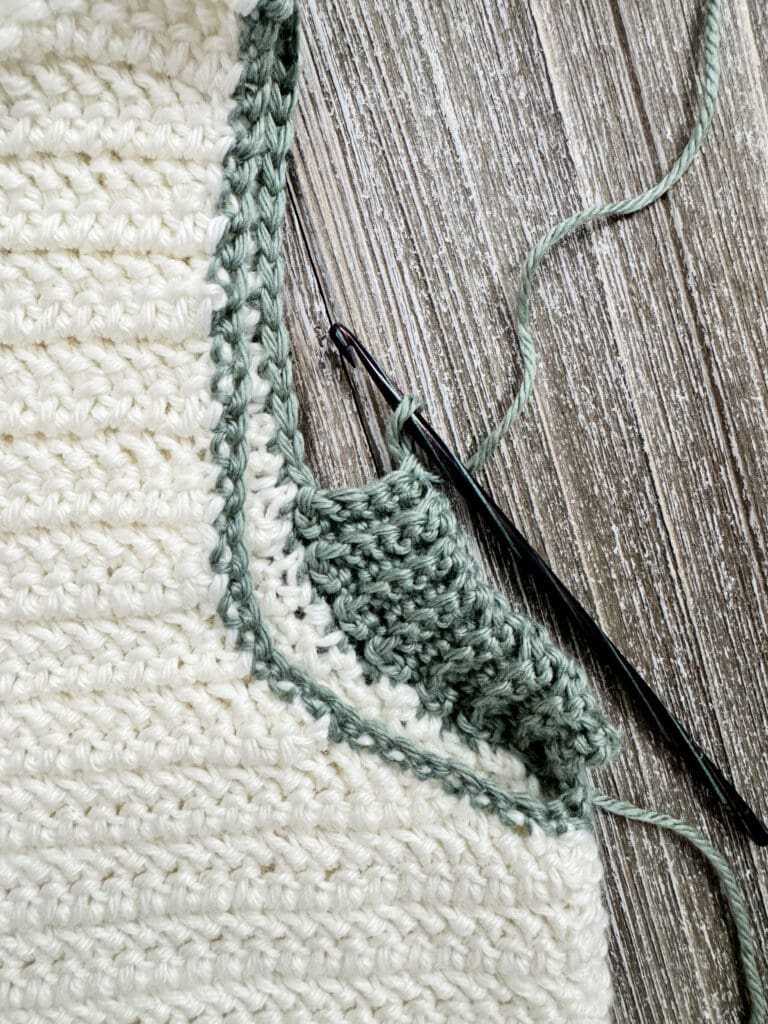
Repeat steps 3-5 all the way around the bottom edge of the vest.
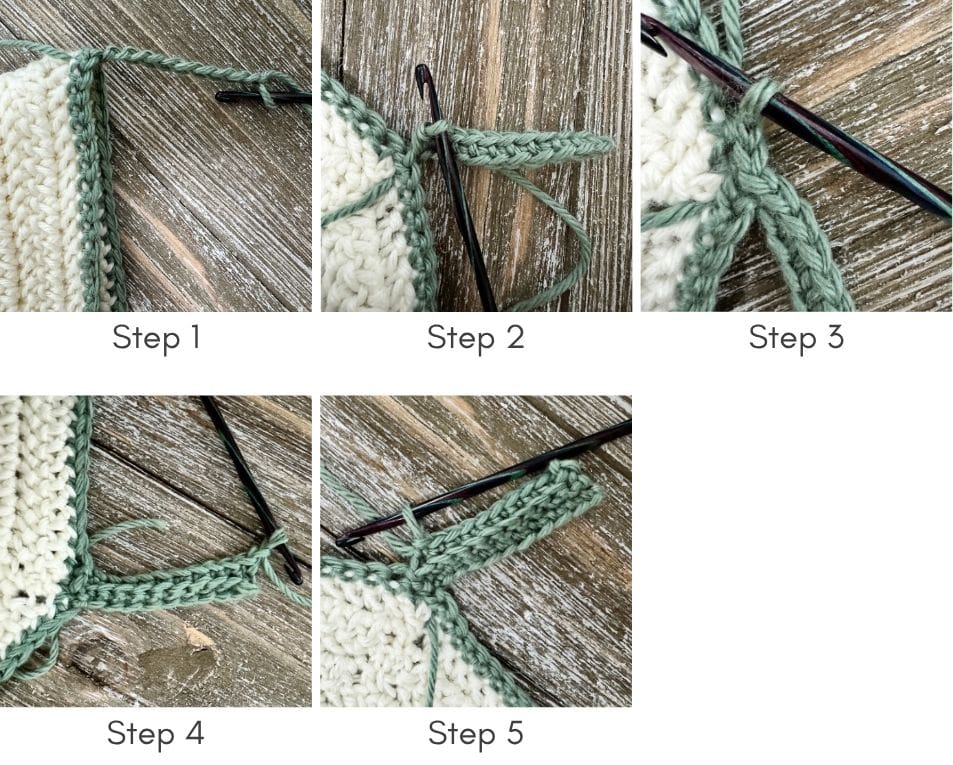
Once you have reached the end of the round, SS in the base st and fasten off leaving a 6″ tail for seaming (if you have only one remaining sc from the setup round and are not able to complete steps 3-5, just SS into the base st and the remaining sc before fastening off).
Seam the open ends of the ribbing together and then continue to Armhole Ribbing.
Armhole Ribbing.
Join yarn at the bottom of the armhole next the seam.
Work the setup round as follows: CH1, SC in same st. Then SC evenly around the armhole, making sure the fabric lays flat without pulling or bunching. Count your stitches on each half to ensure they’re roughly even. Join to first SC with a SS. 32/33
Add ribbing by following the steps below:
Step 1: CH6.
Step 2: SC in 2nd ch from hook and each additional ch. Count 5 sts.
Step 3: SS in the base st and the next 2 sc from the setup round. Turn.
Step 4: Skip the 3 ss, and SCBL in each of the next 5 sc. CH1 and turn.
Step 5: SCBL in each of the next 5 sc. Count 5 sts.
Repeat steps 3-5 all the way around the armhole.
Once you have reached the end of the round, SS in the base st and fasten off leaving a 6″ tail for seaming (if you have only one remaining sc from the setup round and are not able to complete steps 3-5, just SS into the base st and the remaining sc before fastening off).
Seam the open ends of the ribbing together and then repeat for the second armhole. Once the ribbing for both arms is complete, continue to Neckline Ribbing.
Neckline Ribbing
Join yarn anywhere along the back of the neck.
Work the setup round as follows: CH1, SC in same st. Then SC evenly around the neckline, making sure the fabric lays flat without pulling or bunching. Count your stitches on each half to ensure they’re roughly even. Join to first SC with a SS and fasten off.
Add ribbing by following the steps below:
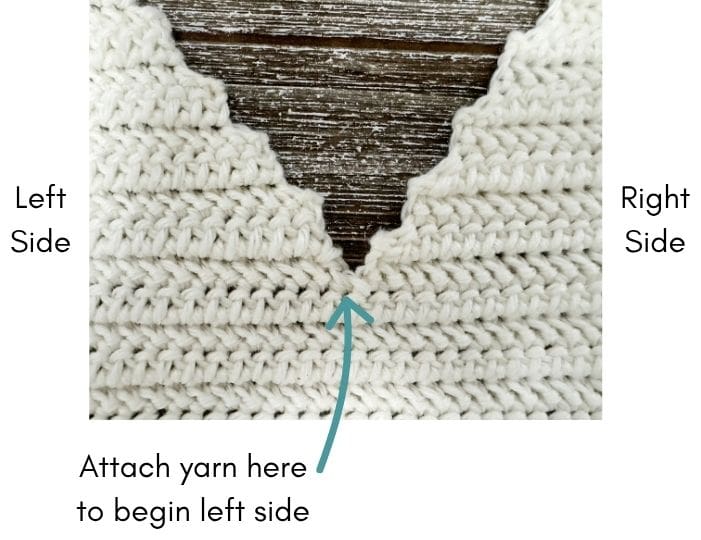
Step 1: With the front of the vest facing you, count 5 sc up from the centre point of the neckline and attach the yarn.
Step 2: CH1, SC in same st. Then SC in each of the remaining 4 stitches towards towards the centre point of the neckline. Count 5 sts.
Step 3: SS in the next 2 SC. Turn.
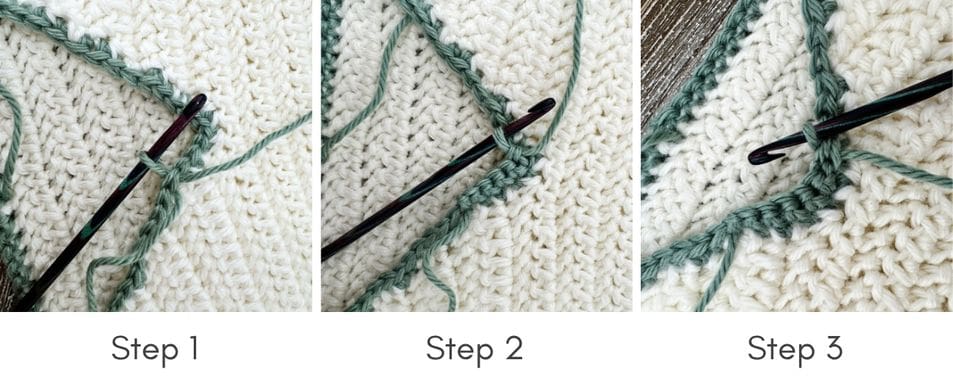
Step 4: Skip the 2 ss, and SCBL in each of the next 5 sc. CH1 and turn. Count 5 sts.
Step 5: SCBL in each of the next 5 sc. Count 5 sts.
Step 6: SS in the base st and the next 2 sc from the setup round. Turn.
Step 7: Skip the 3 ss, and SCBL in each of the next 5 sc. CH1 and turn. Count 5 sts.
Step 8: SCBL in each of the next 5 sc. Count 5 sts.
Repeat steps 6-8 all the way around the neckline.
Once you have reached the end of the round, SS in the base st and fasten off leaving a 6″ tail for seaming (if you have one remaining sc from the setup round and are not able to complete steps 6-8, just SS into the base st and the remaining sc before fastening off).
Seam the open ends of the ribbing together.
Once you’ve seamed the neckline ribbing, your crochet vest is complete! Just weave in any loose ends and block to the final measurements for a polished finish.
You’re done! You just finished making an entire piece of clothing with your own two hands. I hope you enjoyed this crochet vest pattern -leave a comment and let me know how it went!
Pattern PDF File
I hope you enjoyed this free crochet vest pattern.
If you’d like your own copy, the Ad-Free PDF file (which will be emailed to you automatically) can be purchased through Ravelry, or by clicking the “Purchase PDF File” button to the right.
Thank you so much for your support! It means the world to me, and I’m beyond grateful to be able to share my passion with you all.